The steps below explain how you can configure and setup email account on iPhone on iOS7. This tutorial assumes you have already created your email account in cPanel. Start the Settings app in iPhone and tap on Mail, Contacts, Calendars. The screen will look like this after that:
Tap on Add Account and then tap on Other as shown below:
On the next screen tap on Add Mail Account:
The screen will present you to type your name, email and password and short name for description.
Tap Next to move to next screen.
Now you have choice to Select IMAP or POP. With IMAP your emails will stay on the server and you can access them from other devices and computers. Continue with entering INCOMING MAIL SERVER
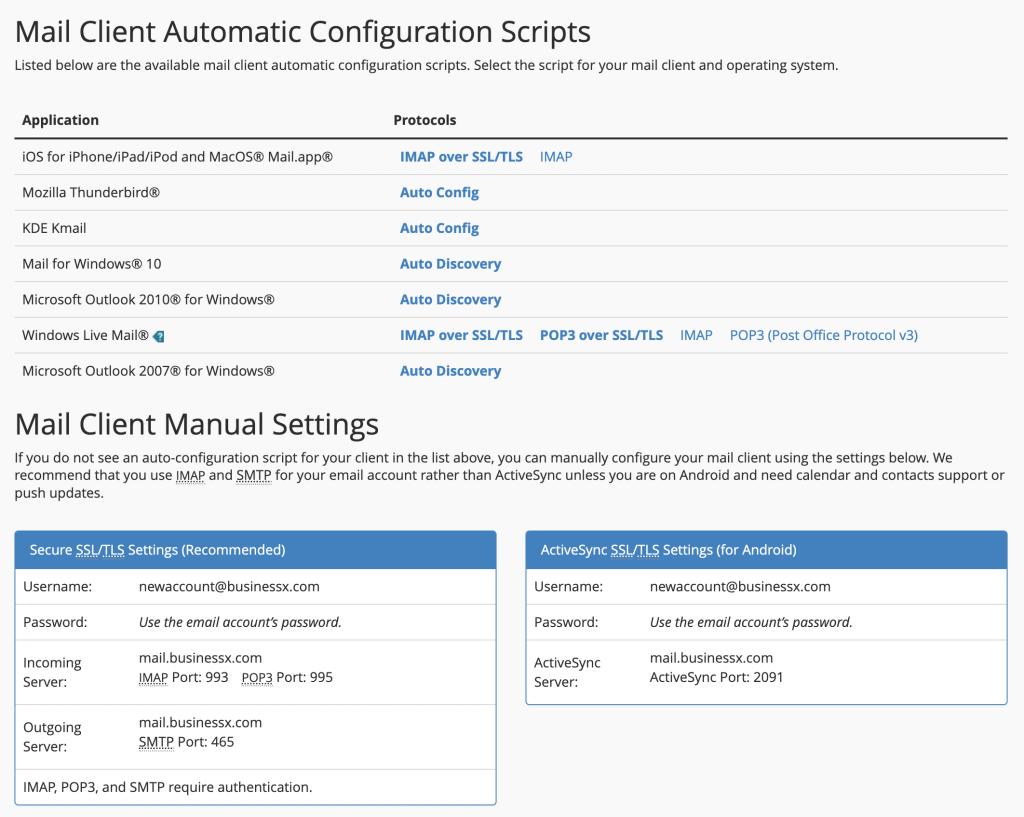
Host Name: You can find this in your cPanel under Configure Email Account screen.
User Name: This is your email address.
Password: This is your email password.
After this move on to enter the OUTGOING MAIL SERVER information.
Host Name: You can find this in your cPanel under Configure Email Account screen.
User Name: This is your email address.
Password: This is your email password.
Tap Next to move to next screen.
Tap Save to save the email account settings on your iPhone. The phone will add the account:
Now you can send and receive emails from your iPhone. You can use the same exact settings on iPod or iPad.
If for some reason you are unable to send email from iPhone, please make sure that you have configured SMTP authentication and using SSL connection. To check the settings, start the Settings app, tap on Mail, Contacts, Calendars. Tap on your email account from the list. Tap on Account. Tap on SMTP under OUTGOING MAIL SERVER. Tap on the PRIMARY SERVER. Make sure it is active and is similar to this screen below with Use SSL selected, Server Port set to 465 or 587, and Authentication is Password.
Enjoy your business email account on your iOS devices on the go.
Note: This is a very simple DNS guide and explanation for easy understanding of DNS use for web hosting customers. It does not go into advanced terminologies to avoid confusion.
Name Servers
For a domain name to work for website and email, it requires properly configured DNS (Domain Name System). Without that Internet users cannot load the website from the correct server or send you email. When you register a domain, you have to configure DNS servers (also called name servers) at the domain registrar. These are typically two hostnames in the format of ns1.yourhostingservice.com and ns2.yourhostingservice.com. This basically delegates the DNS service for your domain to those name servers from where every aspect of domain, subdomains, and email can be controlled.
DNS Zone
Those name servers keep records of your domain in a DNS Zone file. The DNS Zone can tell which server hosts yourdomain.com or a subdomain xyz.yourdomain.com etc.
When someone tries to load your website in the browser, the browser first asks the root name servers about the delegated name servers so it can find where it is hosted. The root name servers provide your hosting company’s name servers that you have configured at the domain registrar. Then your browser asks one of the name servers, where is the website hosted? If it cannot reach one, it will try and ask the second one. Once the response is received, the browser will connect to your web hosting server and request it to send web page.
Record Types
There are different types of records in a DNS Zone file. The following three are most common that you may encounter, especially if you move your website or email from one server to another.
A: This record points the domain or subdomain to an IP address of server.
CNAME: This record points the domain or subdomain to another hostname as an alias. This way if the original hostname’s IP changes, you do not have to change any record in your DNS Zone. There is a restriction on how you can use CNAME. CNAME cannot be used for your domain that also needs A record and MX record. Example: you can create CNAME record for xyz.domain.com but you cannot create CNAME for domain.com because you have to create MX and A record for it as well. This is why typically CNAME records are used for subdomains only.
MX: This is called mail exchanger record and tells which server can receive email. This cannot have an IP address. It must be a fully qualified hostname. There can be multiple MX records with different priority settings.
cPanel Web Hosting
When your account is created on a cPanel web hosting service, your domain’s DNS Zone file is created automatically with all the necessary records in DNS Zone file that resides in your web hosting company’s name servers. Typically your website and email is hosted on the same server, therefore the records are setup like this:
The MX record is not shown here. It is listed under Mail > MX Entry in cPanel.
Moving Website
If you need to move your website away from your hosting company’s website, the other company will provide you IP address of the new web hosting server. You can simply change the A record of your domain (first record shown in the above screen shot). This will automatically update www.yourdomain.com because of CNAME (alias). After making this change, and allowing a couple of hours for DNS propagation, your website will start pointing to the new IP while your email will stay on the current hosting server. Make sure your MX record points to mail.yourdomain.com and mail.yourdomain.com is set as an A record for your hosting server IP where you want to receive email.
Moving Email Server
When you need to move your email to another provider, they will typically give you one or more MX records. You can change the MX Records of your domain by going to cPanel > Mail > MX Entry. Here’s a screen shot how this is setup:
You can edit the record and also add more MX records on this screen. If they provide you with the IP address instead of fully qualified hostname, then you must first create an A record with that IP in Advanced DNS Zone Editor and then use that for the MX. MX record cannot use IP address. It must always use a hostname. Once you configure the MX, also make sure Email Routing shows that now you are using Remote Mail Exchanger. This is important because it will update the necessary configuration on the local mail server on your cPanel web hosting service to either receive mail or send it to remote server for the domain.
Spam Filtering Service
If you are using a third party email filtering service that requires you to change your MX record but still receive email on your cPanel web hosting server after they process your email, then you can change the MX records in MX Entry screen but keep Email Routing to Local Mail Exchanger by selecting the radio button and forcing that setting. Otherwise when you change the MX, cPanel will automatically change it to Remote Mail Exchanger, which will disable any incoming email for your domain.
Hope this is useful. Please leave a comment below and feel free to ask any question you may have.
This short tutorial provides the settings for cPanel email account in Microsoft Outlook 2013. Follow these simple steps to configure your email account in Outlook 2013. You must first log into your cPanel to create the email account. Once you have created the email account, you can follow the steps below. These settings are similar in older versions of Outlook as well if you are familiar with the interface to add new account.
Step 1: Click FILE on the menu
Step 2: Click on the button [+ Add Account]
Step 3: Select (o) Manual setup or additional server types and click [ Next > ] button.
Step 4: Select (o) POP or IMAP and click [ Next > ] button.
Step 5: Enter the following information for your email account that you created in cPanel:
User Information
Your Name: This is the name you want to use for yourself
Email Address: This is the email address that you created in cPanel. It is in a format like user@yourdomain.com
Server Information
Account Type: POP3 (select POP3 if you want to download email to your computer, select IMAP if you want to keep emails on the server and want to access it from other computers as well. Using IMAP will use more disk space and it will keep growing as more emails are stored on the server).
Incoming mail server: you can find this in your cPanel under Configure Email Account screen.
Outgoing mail server (SMTP): same as incoming mail server above from Configure Email Account screen in cPanel
Logon Information
User Name: Your email address again in the format of user@yourdomain.com
Password: Your email password
Step 6: Click [ More Settings … ] button and continue
You can change the email to an easy to remember identity e.g. Work Email etc.
Step 7: Click on Outgoing Server tab
Select the check box [v] My outgoing server (SMTP) requires authentication
And select (o) Use same settings as my incoming mail server.
Step 8: Click Advanced tab and enter the following values:
Incoming server(POP3): 995
Select [v] This server requires an encrypted connection (SSL)
Outgoing server (SMTP): 465
Use the following type of encrypted connection: SSL
Click [ OK ] and Click [ Next ] and this will test incoming/outgoing server for email and finish setting up the account in Outlook 2013.
We hope you like this “how to” and are able to setup your cPanel email settings in Outlook 2013. Happy emailing around the world.
MX (Mail exchanger) record is a type of resource record in the domain name system that specifies which mail servers are responsible for receiving emails for the domain. You can read more about it at http://en.wikipedia.org/wiki/MX_record
When you order a web hosting account, by default your hosting server where your website is hosted also has a mail server. Therefore MX record is automatically created to specify your web hosting server to be the mail server as well and receive emails. That is why you can create and manage email accounts using cPanel interface, which directly interacts with the local mail server on that server.
However at times some clients want to host their email elsewhere. For this reason they will need to change the MX record so that emails can go that particular server. To change the MX, you can click on MX Entry in Mail section of cPanel. For some reason cPanel calls it MX Entry instead of MX Record.
Priority in MX Record
Since it is possible to have multiple mail servers configured to receive emails for a domain, the next screen explains how the priorities work MX records (entries).
You may have to select the domain from the drop down to proceed.
Email Routing
Once you select the domain, you will be presented with the current MX configuration of the domain. For example in this screen shot here we see that domain is configured to receive email on Local server. It is currently using “Automatically Detect Configuration” option to come up with that.
You can keep it as it is i.e. let cPanel automatically detect configuration, or you can choose one of the other three options. They are as follows:
Local Mail Exchanger: Configure local server to always accept mail. Mail will be delivered locally on the server when sent from the server or outside the server.
Backup Mail Exchanger: Configure server as a backup mail exchanger. Mail will be held until a lower number mail exchanger is available.
Remote Mail Exchanger: Configure server to not accept mail locally and send mail to the lowest MX record.
Please be careful with changing this. The Warning is pretty clear: Setting the wrong option here can break receiving mail on your server. If you are at all unsure about which option to select contact your system administrator (that is our support).
You can click on Change button to make the change (if required).
Since there can be multiple MX records in a domain, you can see the listing of your current MX Record(s). You have the option to edit or delete the record:
If you click Edit, it you can modify the Priority or Destination:
Or you can add a new record as well:
Once you are done with the changes, you can see that all the records under MX Records section are what you needed to set. It may take a few hours before the DNS updates propagates and new email starts delivering on the MX records for your domain.
Hope this tutorial makes it easy to manage MX records for your domain. If you need help with it, please feel free to contact us or you can post in the comments section below.
DKIM (DomainKeys Identified Mail) is a means of verifying incoming email. It ensures that incoming messages are unmodified and from the sender from whom they claim to be. Technically DKIM provides a method for validating a domain name identity that is associated with a message through cryptographic authentication. For more information please visit http://www.dkim.org
SPF (Sender Policy Framework) system allows you to specify servers and IP addresses that are authorized to send mail from your domain(s). This feature works to prevent outgoing spam messages using your domain from other computers and servers. If someone tries to send emails spoofing your domain in their email address, the receiving servers will check if you authorized them to send email – failing which such spam will be rejected.
We assume you are already logged into cPanel of your web hosting account. Click on Email Authentication link under Mail to proceed.
By default Email Authentication is disabled. To enable each one, click the Enable button.
DKIM is enabled with just a click of a button.
No further configuration is required for DKIM. The Email Authentication screen will show you if it is active.
To enable SPF, click Enable button.
When SPF is enabled, a new TXT DNS Record is added to your domain’s DNS zone. It uses your domain’s Mail Exchanger (MX) record, A record and the IPv4 address. In most cases this default setting is good enough to authorize these servers to send email.
In addition to default configuration of SPF, the Email Authentication screen allows you to add additional hosts and make changes to the SPF record.
Email authentication helps prevent spam. The options provided in cPanel attempt to equip email messages with verifiable information so that the nature of incoming and outgoing messages can be detected automatically.
Enabling DKIM and SPF should reduce the number of failed delivery notifications you receive when spammers forge messages from your domain(s). These features also work to prevent spammers from forging messages that claim to be from your domain(s).
Recent Comments